


A Delicious Morning Treat
Mornings can be chaotic. Between getting ready for the day, organizing tasks, and ensuring everyone in the household is fed, breakfast often takes a backseat. But what if you had a meal that was both quick and satisfying? That’s where breakfast sliders come in.
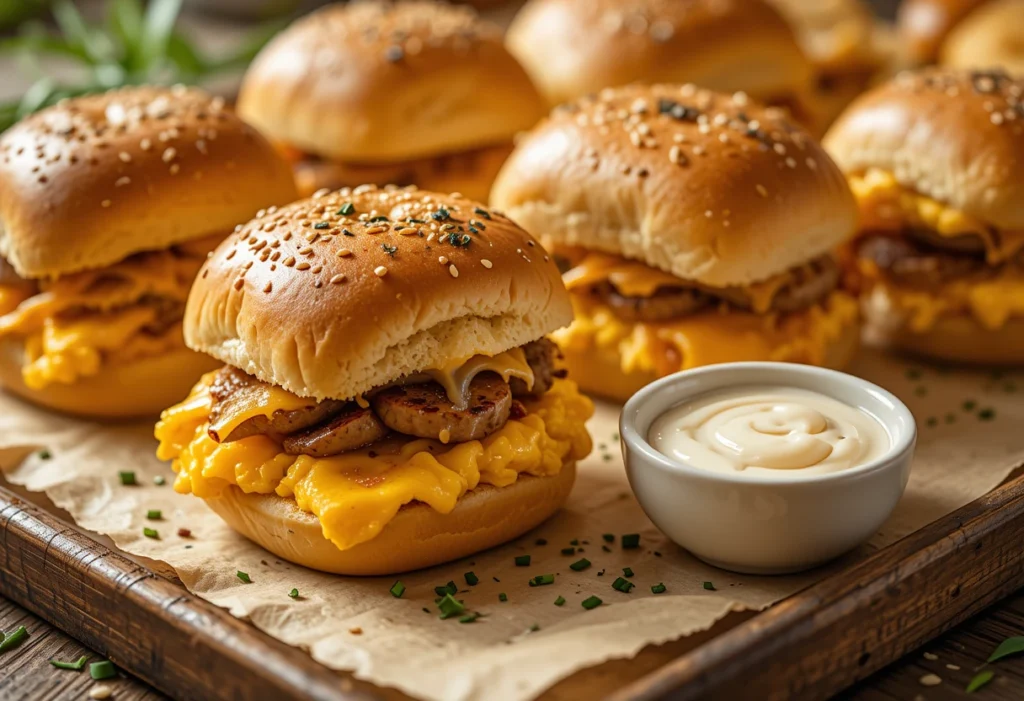
These bite-sized sandwiches are the perfect solution for busy mornings. With layers of fluffy eggs, melted cheese, and sausage tucked between soft buns, they are a delicious and filling way to start the day. Whether you need a grab-and-go meal for the kids or a crowd-pleasing option for brunch, breakfast sliders check all the boxes.
What makes them even better? They are highly customizable. You can swap ingredients, make them healthier, or even prepare them in advance. This guide will walk you through everything you need to know to make the best breakfast sliders, from ingredients to variations, expert tips, and even storage solutions.
Table of Contents
Why You’ll Love This Breakfast Sliders Recipe

If you’re looking for a reason to try this recipe, here are a few:
- Quick & Easy – Ready in less than 30 minutes, perfect for busy mornings.
- Make-Ahead Friendly – Assemble them the night before and pop them in the oven when needed.
- Highly Customizable – Use different meats, cheeses, or bread to match your preference.
- Family-Friendly – Both kids and adults love them.
Whether you’re hosting a brunch or need a convenient breakfast solution, these sliders will become your new go-to recipe.
Ingredients for Breakfast Sliders
Before you begin, gather the essential ingredients. Using fresh, high-quality ingredients ensures the best flavor and texture.
| Ingredient | Quantity |
|---|---|
| Slider buns | 12 |
| Eggs | 6 |
| Cheddar cheese (slices) | 6 |
| Cooked sausage | 6 slices |
| Butter (melted) | 2 tbsp |
| Everything bagel seasoning | 1 tsp |
| Milk | ¼ cup |
| Salt & pepper | To taste |
Each ingredient plays a key role in enhancing the overall taste. The eggs provide a fluffy, protein-rich filling, while the cheese adds a creamy texture. Sausage delivers that smoky, savory bite, and the butter on top gives the sliders a rich, golden crust.
How to Make Breakfast Sliders (Step-by-Step Guide)

1. Preparing the Ingredients
The first step in making breakfast sliders is preparing the core ingredients. Start by cooking the eggs and meat:
- Scramble the eggs: In a bowl, whisk together eggs, milk, salt, and pepper. Cook them over medium heat until soft and fluffy. Avoid overcooking as they will bake further in the oven.
- Prepare the meat: For sausage, ensure it’s fully cooked before assembling.
2. Assembling the Sliders
Once the core ingredients are ready, it’s time to assemble the sliders:
- Slice the slider buns in half without separating them individually. This keeps the sliders intact and makes assembly easier.
- Lay the bottom halves of the buns in a baking dish.
- Layer the scrambled eggs evenly over the buns.
- Add the cooked sausage on top of the eggs.
- Place the cheese slices over the meat to ensure even melting.
- Cover with the top half of the buns, pressing down slightly to keep everything in place.
3. Baking the Sliders
Now that your sliders are assembled, it’s time to bake:
- Brush the melted butter over the top of the buns. This adds flavor and helps create a crispy, golden crust.
- Sprinkle everything bagel seasoning for an extra layer of flavor.
- Cover loosely with foil and bake at 350°F (175°C) for 10-15 minutes until the cheese melts.
- Remove the foil for the last 3-5 minutes to give the buns a toasted, golden finish.
4. Serve & Enjoy
Once baked, let the sliders cool for a minute before slicing along the bun edges. Serve them hot with your favorite sides.
These sliders can be made in bulk, making them ideal for meal prep. If you’re making them ahead of time, store them properly and reheat them when ready to eat.
Variations & Customization Options
A great advantage of breakfast sliders is their versatility. Whether you have dietary restrictions or simply want to experiment with flavors, you can easily customize this recipe to suit your needs. Below are a few variations that will keep your sliders exciting every time you make them.
Healthier Version
If you’re looking for a lighter, more nutritious option, consider these swaps:
- Whole wheat slider buns instead of white bread for extra fiber.
- Use egg whites instead of whole eggs to lower cholesterol.
- Low-fat cheese to cut back on saturated fat.
- Lean sausage for a protein-packed yet healthier alternative.
These adjustments make breakfast sliders lower in calories while maintaining great taste and texture.
Vegetarian Option
For a meatless version, swap sausage and add more veggies:
- Sautéed spinach, mushrooms, or bell peppers for a savory, nutrient-rich filling.
- Avocado slices for creaminess and healthy fats.
- Feta or goat cheese for a tangy twist.
This version is loaded with flavor and perfect for those who follow a vegetarian diet.
Spicy Twist
If you love a bit of heat, spice up your sliders with these add-ins:
- Chopped jalapeños mixed into the scrambled eggs.
- Spicy pepper jack cheese instead of cheddar.
- A drizzle of hot sauce or sriracha over the eggs before baking.
A little spice adds depth and enhances the overall taste of your breakfast sliders.
Sweet & Savory Combo
For those who love a sweet and savory balance, try:
- Add a drizzle of honey or maple syrup before serving.
- Cinnamon butter brushed on the buns instead of regular butter.
This variation creates a rich, indulgent breakfast slider with contrasting flavors that work beautifully together.
Expert Tips for the Best Breakfast Sliders
To ensure your sliders turn out perfectly every time, follow these expert tips:
✔ Use fresh, high-quality ingredients – The better the ingredients, the better the final result. Fresh eggs, good-quality cheese, and homemade or bakery slider buns elevate the dish.
✔ Slightly undercook the eggs – Since they will bake further in the oven, avoid overcooking them on the stovetop to maintain a soft, fluffy texture.
✔ Choose the right cheese – If you want a melty, creamy texture, opt for cheddar, Swiss, or mozzarella. Hard cheeses may not melt as well.
✔ Don’t skip the butter topping – It adds a rich, golden crust to the buns while keeping them from drying out.
✔ Cover with foil while baking – This prevents the tops from burning before the cheese fully melts. Remove the foil for the last few minutes for a nice golden finish.
✔ Make them ahead for convenience – Assemble the sliders the night before, store them in the fridge, and bake them fresh in the morning.
✔ Freeze for later – These sliders can be frozen for up to a month and reheated in the oven or air fryer for a quick breakfast option.
What to Serve with Breakfast Sliders
Breakfast sliders are delicious on their own, but pairing them with complementary sides can make your meal even better. Here are some great options:
- Fresh fruit salad – A refreshing, light side that balances the richness of the sliders.
- Hash browns or breakfast potatoes – Crispy potatoes pair perfectly with soft, cheesy sliders.
- Greek yogurt with honey and granola – Adds protein and a bit of crunch.
- Smoothies or fresh juice – A vitamin-packed drink to round out your breakfast.
- Coffee or tea – The ultimate classic pairing for any breakfast dish.
These options enhance the meal’s texture and flavor, making it a well-rounded breakfast or brunch.
How to Store and Reheat Breakfast Sliders
If you’re meal prepping or have leftovers, storing and reheating sliders properly ensures they stay fresh and delicious.
Refrigerating
- Keep leftover sliders in an airtight container in the fridge for up to three days.
- To avoid sogginess, place a paper towel inside to absorb excess moisture.
Freezing
- Wrap individual sliders in plastic wrap or foil and place them in a freezer-safe bag.
- Store in the freezer for up to 1 month.
Reheating Options
- Oven: Reheat at 350°F (175°C) for 10 minutes for the best texture.
- Air Fryer: Heat at 320°F (160°C) for 5-6 minutes for a crispy finish.
- Microwave: Heat on medium power for 1-2 minutes. The buns may soften, so this method is best for convenience.
For best results, reheating in the oven or air fryer preserves the sliders’ crispy texture and prevents them from becoming soggy.
Frequently Asked Questions (FAQs)
To ensure you get the best results when making breakfast sliders, here are answers to some of the most common questions.
1. Is it possible to prepare breakfast sliders in advance?
Yes! You can assemble them the night before, cover them with plastic wrap, and store them in the fridge. When ready to bake, simply pop them in the oven as directed. This makes them perfect for meal prepping or hosting brunch without any last-minute rush.
2. How do I store leftover breakfast sliders?
If you have leftovers, keep them in an airtight container in the fridge for up to three days. To keep them from becoming soggy, place a paper towel in the container to absorb excess moisture.
3. Can I freeze breakfast sliders?
Absolutely! To freeze:
- Wrap individual sliders in plastic wrap or foil and place them in a freezer-safe bag.
- Label the bag with the date and store for up to one month.
When ready to eat, reheat in the oven, air fryer, or microwave.
4. How do I reheat frozen breakfast sliders?
For optimal results, try one of these reheating methods:
- Oven: Bake at 350°F (175°C) for 10-12 minutes until heated through.
- Air Fryer: Heat at 320°F (160°C) for 5-6 minutes for a crispy texture.
- Microwave: Heat on medium power for 1-2 minutes, though the buns may soften.
5. Can I make these sliders without an oven?
Yes! If you don’t have an oven, you can use an air fryer at 320°F (160°C) for 6-7 minutes or cook them in a covered pan over low heat until the cheese melts and the buns are warm.
6. What other meats can I use instead of sausage?
There are plenty of options to change up the protein:
- Turkey sausage for a leaner option.
- Ham slices for a classic breakfast sandwich flavor.
- Chorizo for a spicier, more flavorful alternative.
- Smoked salmon for an elevated, gourmet twist.
7. How can I make my breakfast sliders extra crispy?
- Brush extra melted butter on the buns before baking.
- Use a baking sheet instead of a casserole dish to allow more airflow around the buns.
- Bake uncovered for the last 3-5 minutes to create a crispy, golden-brown finish.
Troubleshooting Common Issues
Even with a simple recipe, small mistakes can affect the outcome. Here’s how to fix common problems:
Problem: The sliders turned out soggy
Solution: Avoid adding too much liquid to the eggs, and use a slightly drier filling. If using cooked sausage, pat it dry before layering. Also, do not cover the sliders too tightly when baking.
Problem: The cheese didn’t melt properly
Solution: Make sure the cheese is at room temperature before baking. If it still doesn’t melt fully, bake uncovered for a few extra minutes.
Problem: The buns got too hard in the oven
Solution: Brush them generously with butter and cover with foil for most of the baking time. This keeps them soft while allowing the cheese to melt.
Final Thoughts: Why Breakfast Sliders Should Be Your Go-To Recipe

Breakfast sliders are more than just a meal; they are a versatile, customizable, and delicious way to start the day. Whether you’re meal prepping, hosting brunch, or just want something quick and satisfying, these sliders are the perfect choice.
They offer a balance of protein, carbs, and healthy fats, making them both filling and nutritious. Plus, with countless ways to customize them—whether you prefer a healthier version, a vegetarian option, or a spicy kick—they never get boring.
If you haven’t tried making breakfast sliders yet, now is the time. They are simple to prepare, easy to store, and guaranteed to be a hit with the whole family.
Try This Recipe Today!
Now that you have the complete guide to making the best breakfast sliders, it’s time to put it into action. Gather your ingredients, follow the step-by-step instructions, and enjoy a restaurant-quality breakfast at home.
If you’re a fan of quick and delicious breakfast ideas, you’ll love these Breakfast Sliders! Check out this detailed guide to make the perfect batch, whether for a busy morning or a weekend brunch. And if you’re in the mood for something unique and flavorful, try this Honey Walnut Shrimp recipe for a crispy, sweet, and savory dish that’s sure to impress!
If you give this recipe a try, share your experience in the comments! Do you have a favorite variation? Share your tips, and let’s make the best breakfast sliders together!